WM Jonssen, 2019-01-24
The nginx web server is a fast, lightweight server designed to efficiently handle the needs of high-traffic websites. Although commonly used to serve static content, it's quite capable of handling dynamic pages as well. This guide will help you install and run nginx with PHP via FastCGI for Centcount Analytics on your Ubuntu 16.04 Server.
The steps in this guide require root privileges. Be sure to run the steps below as root or with the sudo prefix.
1. To confirm your hostname, issue the following commands on your Server:
hostname
hostname -f
The first command shows your short hostname, and the second shows your fully qualified domain name (FQDN).
2. To reset your hostname, run the following commands:
hostnamectl set-hostname your_hostname
hostname -F /etc/hostname
The first command sets your hostname, the second reads hostname or NIS domain name from given file.
3. To modify hosts file after you reset your hostname, otherwise you will get a warning unable to resolve host with sudo prefix. To solve this issue, please insert a line to set your hostname under localhost in
File: /etc/hosts
127.0.0.1    localhost
127.0.0.1    your_hostname
Before you begin, please make sure your system is up to date. Execute the commands below to update:
sudo apt-get update
sudo apt-get upgrade
This guide is written for a non-root user. Commands that require elevated privileges are prefixed with
sudo. If you're not familiar with thesudocommand, see the Linux Users and Groups guide.
Install the nginx web server and PHP dependencies:
sudo apt-get install nginx php7.0-cli php7.0-cgi php7.0-fpm
In this guide, the domain example.com is used as an example site. Substitute your own FQDN or IP in the configuration steps that follow.
Nginx uses server directives to specify name-based virtual hosts. Nginx calls these server blocks. All server blocks are contained within server directives in site files, located in /etc/nginx/sites-available. When activated, these are included in the main nginx configuration by default.
1. We made an example configuration file for you below. You should now have the following server block in the nginx virtual host configuration. Replace all instances of example.com with your domain, modify the root path as shown below, and add the location ~ \.php$ block. The SSL certificate is recommended for connection security. You should add a new server block to listening 443 port. Replace the example SSL certificate file to your certificate file.
Create File: /etc/nginx/sites-available/example.com
server {
    listen 80;
    server_name example.com;

    gzip on;
    gzip_min_length 1k;
    gzip_comp_level 2;
    gzip_types text/plain application/javascript application/x-javascript text/css application/xml text/javascript application/x-httpd-php image/jpeg image/gif image/png;
    gzip_vary on;
    gzip_disable "MSIE [1-6]\.";

    access_log /var/www/html/example.com/logs/access.log;
    error_log /var/www/html/example.com/logs/error.log;
    root  /var/www/html/example.com/public_html;
    index  index.html index.php;

    location ~ \.php$ {
        include snippets/fastcgi-php.conf;
        include fastcgi_params;
        fastcgi_connect_timeout 300;
        fastcgi_read_timeout 300;
        fastcgi_send_timeout 300;
        fastcgi_pass unix:/run/php/php7.0-fpm.sock;
        fastcgi_param SCRIPT_FILENAME /var/www/html/example.com/public_html/$fastcgi_script_name;
    }
}


server {
    listen 443;
    server_name example.com;

    gzip on;
    gzip_min_length 1k;
    gzip_comp_level 2;
    gzip_types text/plain application/javascript application/x-javascript text/css application/xml text/javascript application/x-httpd-php image/jpeg image/gif image/png;
    gzip_vary on;
    gzip_disable "MSIE [1-6]\.";

    ssl on;
    ssl_certificate /etc/ssl/private/example.com.crt;
    ssl_certificate_key /etc/ssl/private/example.com.key;
    ssl_session_timeout 5m;
    ssl_protocols TLSv1 TLSv1.1 TLSv1.2;
    ssl_prefer_server_ciphers on;

    access_log /var/www/html/example.com/logs/access.log;
    error_log /var/www/html/example.com/logs/error.log;
    root  /var/www/html/example.com/public_html;
    index  index.html index.php;

    location ~ \.php$ {
        include snippets/fastcgi-php.conf;
        include fastcgi_params;
        fastcgi_connect_timeout 300;
        fastcgi_read_timeout 300;
        fastcgi_send_timeout 300;
        fastcgi_pass unix:/run/php/php7.0-fpm.sock;
        fastcgi_param SCRIPT_FILENAME /var/www/html/example.com/public_html/$fastcgi_script_name;
    }
}
2. Create the root directory referenced in this configuration, replacing example.com with your domain name:
sudo mkdir -p /var/www/html/example.com/public_html
sudo mkdir -p /var/www/html/example.com/logs
3. Configure PHP7.0-FPM to optimize server performance.
Modify File: /etc/php/7.0/fpm/pool.d/www.conf (below settings are based on a 2GB RAM VPS)
;3 possible values for pm: static(recommended), dynamic, ondemand
pm = static

; Note: Used when pm is set to 'static', 'dynamic' or 'ondemand'
pm.max_children = 100

; Note: Used only when pm is set to 'dynamic'
pm.start_servers = 40
pm.min_spare_servers = 20
pm.max_spare_servers = 100
4. Enable the site, disable the default host, and restart the web server:
sudo ln -s /etc/nginx/sites-available/example.com /etc/nginx/sites-enabled
sudo rm /etc/nginx/sites-enabled/default
sudo systemctl restart php7.0-fpm nginx
5. To deactivate a site, simply delete the symbolic link:
sudo rm /etc/nginx/sites-enabled/example.com
sudo systemctl restart nginx
6. The source file is saved, and the site can be re-enabled at any time by recreating the symbolic link.
If you are using nginx to host more than one site, create multiple virtual host files using the method above.
You may also want to edit the http block in /etc/nginx/nginx.conf, which applies across all sites and allows the following options, among others:
Hide HTTP header information using server_tokens
Configure SSL/TLS settings
Customize log file paths
The MySQL database engine is one of the leading open-source relational database engines and is a popular database solution for web-based applications.
1. Install the MySQL server packages and required PHP support for MySQL:
sudo apt-get install mysql-server php7.0-mysql
During the installation process you will be prompted to set a password for the MySQL root user via an ncurses menu. Choose a strong password and keep it in a safe place for future reference.
2. Log in to the MySQL command line interface (CLI) as the root user. When prompted, provide the password set in Step 1:
mysql -u root -p
3. To ensure that PHP will be able to access the MySQL connector you just installed, restart the PHP service by issue the following command:
sudo systemctl restart php7.0-fpm
4. Edit mysql config file to change the charset settings and sql mode.
Modify File: /etc/mysql/my.cnf
Add below settings into [client] section and [mysqld] section.
[client]
default-character-set  = utf8

[mysqld]
default-storage-engine = INNODB
character-set-server   = utf8
collation-server       = utf8_general_ci
sql_mode = "NO_ZERO_IN_DATE,NO_ZERO_DATE,ERROR_FOR_DIVISION_BY_ZERO,NO_AUTO_CREATE_USER,NO_ENGINE_SUBSTITUTION"
NoteIf at any point you need to change the root password, log in as shown in Step 2 and enter the following command, replacing password with the new root password:
ALTER USER ‘root’@‘localhost’ IDENTIFIED WITH ‘mysql_native_password’ BY ‘password’;
sudo apt-get install redis-server php-redis
sudo apt-get install php7.0-gd php7.0-curl php7.0-mbstring php7.0-json
sudo apt-get install postfix
Notice: Some VPS providers denied the mail sending port. So, make sure your VPS is allowed to use mail sending port, otherwise Postfix will not work properly.
sudo systemctl restart php7.0-fpm nginx
Create a file called test.php in your site's public_html directory with the following contents:
File: /var/www/html/example.com/public_html/test.php
<?php phpinfo(); ?>
When you visit http://www.example.com/test.php in your browser, the standard 'PHP info' output is shown.
1. You can download Centcount Analytics installation file from GitHub or Gitee.
Execute the commands below:
cd /var/www/html/example.com/public_html
git clone https://github.com/WMJonssen/Centcount-Analytics.git CA
mv CA/.git .
rm -rf CA
git reset --hard
2. Unzip IP address library package which is included in Centcount Analytics project.
Execute the commands below:
cd /var/www/html/example.com/public_html/ipdb
unzip ipdb.zip
Centcount Analytics packed 2 free IP address libraries (IP2Location & GeoIP) and offers API to access it. You can directly replace the free edition to the commercial edition which offered ISP information & more accurate. And you don't have to change any code.
3. Modify Security Configuration File: /var/www/html/example.com/public_html/config/config_security.php
/************* Security Config Start *************/
//force ssl
define('FORCE_SSL', true);//If you don't have SSL Certificate, please set this const to "false".
//check ssl
define('IS_HTTPS', isset($_SERVER['HTTPS']) && ($_SERVER['HTTPS'] === 1 || $_SERVER['HTTPS'] === 'on') ? true : false);
//define security transfer protocol
define('PROTOCOL', IS_HTTPS ? 'https://' : 'http://');
//define API transfer protocol
define('CURL_PROTOCOL', 'https://');//If you don't have SSL Certificate, please set this const to "http://".
/************** Security Config End **************/
We strongly recommend you apply a SSL Certificate for your analytics website.
4. Modify Common Configuration File: /var/www/html/example.com/public_html/config/config_common.php
/*************** CA CONFIG START **************/
//encode factor
define('ENCODE_FACTOR', '123456789');//RESET YOUR PRIVATE ENCODE FACTOR, IT IS VERY IMPORTANT
//mysql local root name
define('ROOT_USER_LOCAL', 'root');//set your mysql login username here (Creating Database Permission Is Necessary)
//mysql local root password
define('ROOT_PASSWORD_LOCAL', 'password');//set your mysql login password here
//administrator's timezone: PRC
define('ADMIN_TIMEZONE', 'PRC');//set administrator's timezone
//default timezone: PRC
define('DEFAULT_TIME_ZONE', 'PRC');//set default timezone
//error log host
define('ERROR_LOG_HOST', 'www.yourdomainname.com');//set Error Log host (You have to upload file errlog.php to this host under server's root directory)
/**************** CA CONFIG END ***************/
Notice: Some VPS providers denied the mail sending port. So, make sure your VPS is allowed to use mail sending port, otherwise Postfix will not work properly.
5. Modify Mail Configuration File: /var/www/html/example.com/public_html/config/config_mail.php
/************* Config Mail Start ***********/
//administrator mail
defined('ADMIN_MAIL') || define('ADMIN_MAIL', '[email protected]');
//auto response mail
defined('AUTORESPONSE_MAIL') || define('AUTORESPONSE_MAIL', '[email protected]');
//notification mail
defined('NOTIFICATION_MAIL') || define('NOTIFICATION_MAIL', '[email protected]');
//fatal error mail
defined('FATALERROR_MAIL') || define('FATALERROR_MAIL', '[email protected]');
/************** Config Mail End ************/
6. Modify Redis Configuration File: /var/www/html/example.com/public_html/config/config_redis.php
/************* Redis Config Start *************/
//redis instance 0 for kernel process (information of process, ticket, session)
define('REDIS_IP_0', '127.0.0.1');
define('REDIS_PORT_0', 6379);
define('REDIS_DB_0', 0);
//redis instance 1 for realtime visitor data (all information of realtime)
define('REDIS_IP_1', '127.0.0.1');
define('REDIS_PORT_1', 6379);
define('REDIS_DB_1', 1);
//redis instance 2 for CA javascript (site settings, site domains, robots list)
define('REDIS_IP_2', '127.0.0.1');
define('REDIS_PORT_2', 6379);
define('REDIS_DB_2', 2);
//redis instance 3 for session (session information)
define('REDIS_IP_3', '127.0.0.1');
define('REDIS_PORT_3', 6379);
define('REDIS_DB_3', 3);
/************** Redis Config End **************/
If your VPS configurated Multi-Core CPU. We strongly recommend setting multi-instance redis to improve Centcount Analytics gets maximum performance.
For now, every thing is ready for installing Centcount Analytics.
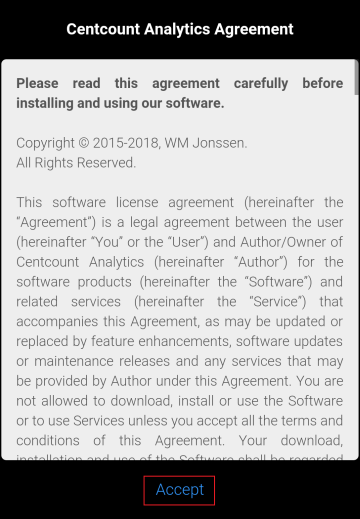
1. Visit the url: https://www.yourdomainname.com/install.php in browser. The Centcount Analytics Agreement will be shown.

2. Please read Centcount Analytics agreement carefully before installing. If you agree on all the terms, then click the "Accept" button to continue.

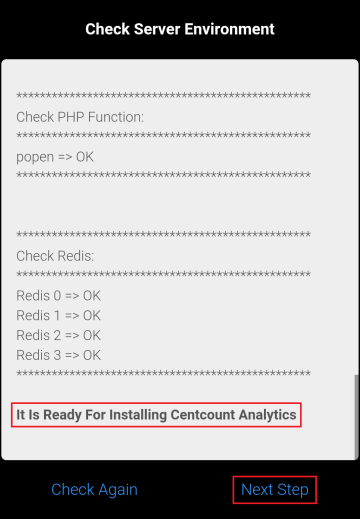
3. If all settings & configurations are all right, click the "Next Step" button to continue installing. If there is something wrong, please make sure all issues be solved before installing.

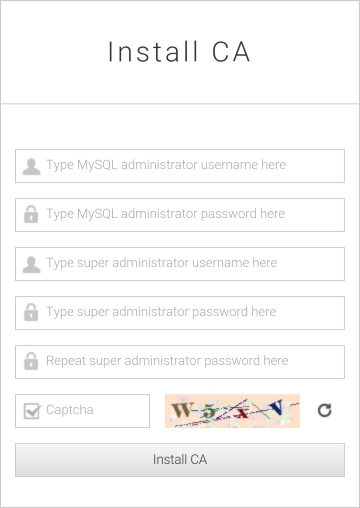
4. Input MySQL username & password, specify the administrator's login email & password for Centcount Analytics. And click the "Install CA" button to finish installing.

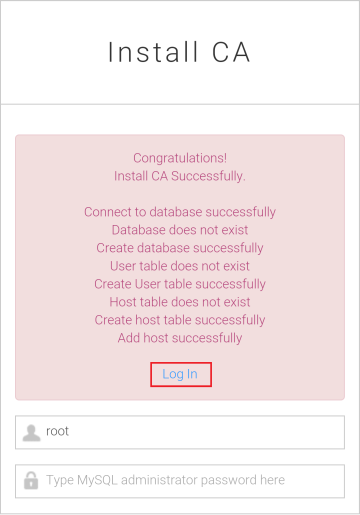
5. Now, you can login Centcount Analytics to add a site.
Congratulations, you've configured the nginx web server to use PHP-FastCGI & Redis for Centcount Analytics!
Previous Article
Next Article